
erica
JUNE 24, 2021
SO YOU WANT TO GO CANYONEERING?
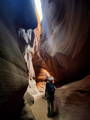
If you’ve ever stood between two massive sandstone walls, it’s not hard to imagine why canyoneering has become one of our favorite ways to explore the desert.While canyoning is an inherently dangerous sport, it’s an incredibly thrilling experience.
We are not trained professionals - just two kids that love to explore, and have taken the time to get educated on how to do so safely. This blog is in no way a substitute for proper training on how to appropriately use gear. We recommend taking a class with the Canyoneering association to get comfortable before going off on your own. Check HERE to find a class that works for you.
Before you head out on the adventure of a lifetime, be sure to brush up on the Leave No Trace principles HERE.

CANYONEERING OVERVIEW
If you want to get the best out of your canyoneering experience, and stay safe while doing it, here are our tips.
Get an explanation of the rating system so that you can pick a route that's appropriate for your skill level.
Our favorite spots for those of you who may be new to canyoneering.
GEAR
01: HARNESS
You can easily use your regular climbing harness, but the wear and tear of slot canyons will be evident on your harness and your pants after a few good down climbs. We recommend investing in a Petzl Canyon Club Harness or Singing Rock Harness when you’re ready. You can also get a scuttle butt (protective seat) if you have a harness already, but most harnesses are built interwoven making adding this to your regular climbing harness a challenge if not impossible.

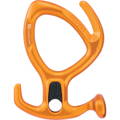
02: DESCENDERS
Personal preference, as most rappel devices accomplish the same goal. A classic ATC will do what you need, but if your hauling bags around you might want to look into options like the Petzle Pirana or Imlay CRITR2 that will assist with weight management on rappel. You can find those HERE.
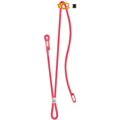
We love using our duel connect adjust when canyoning. It allows us to set up our rappel deceive on a fixed point with enough space to set up a Prusik, and also offers us an adjustable way to anchor in instead of using a daisy chain.No matter how confident and comfortable we are on a rappel, if we are dropping more than 30 ft, we always like to back up our system up with a Prusik.
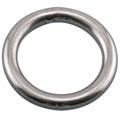
03: ANCHORS
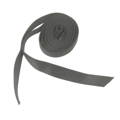
In addition to having a basic understanding of how to rappel, its important to know how to inspect and set up an anchor system using webbing and rapid links. We always carry webbing and links with us just incase we need to set our own anchor, or reset something thats looking iffy:
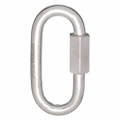
You’ll probably see aluminum links and rappel rings, Steel hold up better to sand or wet sandy ropes. When it comes to rapid links we say the bigger the better. 7 or 8mm is ideal for high traffic areas and fatter ropes.
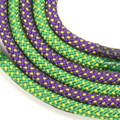
04: ROPE
Again, this will depend on what kind of canyons you're getting into.First and foremost, you will want a STATIC rope.
From there, you can choose the length. We get into some bigger rappels so we have been rocking a 70m, but most canyons have shorter rappels so a 40-60m rope works great. Just be sure to check your routes and know each rappels length before heading out on an adventure.
You’ll also want to keep in mind if you’re planning to hit water or not. Check for ropes with higher concentration of polyester to aid with water absorption. We recommend starting with the Canyonero 9.2MM.
05: ASCENDING
Quite a splurge if you’re just starting, but having a way to ascend could be a potential life saver. We have yet to use ours, but it's a relief to have them with us. It will take some getting used to, and can be a quite the work out, so definitely practice before using in a canyon. You can find what we have HERE.


06: SHOES
Good shoes are a MUST when you start dropping into canyons.
Chacos and hiking boots are comfy, but lately we have been loving our La Sportivas.
Feeling confident on a down climb makes a world of difference and the sticky souls of these bad boys help us get into some more technical canyons with ease.Sportiva TX 4 mens/womens are less breathable but are great for dry canyons. Sportiva TX3 or Sawela Wildfire. Boots make for a good approach shoe if you're planning to hit some water. The mesh allows for breathability while still providing the support needed for climbing up and down canyons.


CHOOSE YOUR ROUTE
When you start to read more about canyons you’ll notice each is rated differently. In order to make sure you pick a canyon that meets your technical skills it’s important to understand what these ratings mean.
TECHNICAL CLASSIFICATION
The number you see at the start of a rating indicates rope usage and what to expect technically through the canyon. The higher the number, the more technical the route.
CLASS 1: YOUR BASIC HIKING CANYON
No ropes or technical gear required.
(Example: Little Wild Horse Canyon)
CLASS 2: LIGHT OR BEGINNER CANYONING
Expect to find some scrambling or hand lines here.
(Example: North East Fork of TCB)
CLASS 3: INTERMEDIATE CANYONING
Ropes and rappelling are required to navigate through Class 3 canyons successfully. Generally speaking once you pull the rope after the first rappel, the only way out is through (with the exception of fixing your rope).
(Example: Baptist Draw)
CLASS 4: EXPERT CANYONING
Class 4 canyons require anchor building typically beyond chokes stones and webbing, pothole escapes, and advanced climbing skills.
(Example: Englestead Canyon)
WATER RATING
The letter you’ll find after the technical rating indicates not only if there is water in the canyon, but the type of water you can expect to encounter on your route.
CLASS A
The canyon is most likely dry, you may run into a few spots of standing water after a rain up to waist deep.
CLASS B
Expect water pools and some swimming, but overall stagnant water.
CLASS C
Water is flowing through the canyon. In Class C canyons its common to rappel waterfalls, swim through rivers, and an understanding of wet canyon rope techniques are recommended.
GRADE
The last part of the rating you’ll see on most routes refers to the length of time require to complete the canyon. This is averaged by the time it would take a small and experienced group to complete the canyon.
GRADE I
Short - plan for 2-4 hours
GRADE II
Half day - plan for 4-6 hours
GRADE III
Day Trip - plan for 6-8 hours
GRADE IV
Extended Day Trip - Plan for 8+ hours
GRADE V
Overnight - typically a 2 day canyon
GRADE VI
Extended Trip - 2 or more days
ADDITIONAL RISK
You may come across an “R” or “X” at the end of a rating on more advanced canyons. If you notice this at the end of the canyon rating we urge caution. This typically means the canyon requires advanced route finding, difficult rappels, exposed traverses and challenging anchors.
RECOMMENDED BEGINNER ROUTES
If you’re ready to try your first canyon, we recommend downloading the Road trip Ryan app. It's about 6 bucks per area, but this will give you access without internet. Having a map and route description accessible can be a game changer. We like to bring our Garmin inReach whenever we head out on less populated adventures.
BAPTIST DRAW
3B II-III
CHECK IT OUT ON ROADTRIP RYAN HERE.
A perfect beginner route!
Take the short loop and you'll hit a few awesome rappels, including an 80 ft drop to finish off the canyon before making your way back through Upper Chute.
The canyon narrows enough that you can practice some technical skills, such as stemming, with little risk. We have yet to run into water in this canyon, but Road Trip Ryan has it rated as a class B.
If you're up for a LONG day you can continue down into the technical section of lower Chute canyon. Some more short rappels, down climbs and a slide is totally worth it. Most people do the short loop so you'll likely have the whole canyon to yourself. The long route took us 12 hours from start to finish and required extensive route finding and scrambling to get back to our car.
ANGEL COVE SLOT
3A II
CHECK IT OUT ON ROADTRIP RYAN HERE.
You'll likely want 4WD to reach the trailhead, as winds blow a large amount of sand over the road.
A single camp spot at the trailhead makes a great spot to crash before or after you explore.
Depending on what fork you go down, you'll get to practice some different techniques. The North Fork generally has fixed ropes allowing for assisted down climbs if you feel comfortable. The South Fork, which descends more rapidly, has some fun rappels. You can choose to go all the way to the river finishing off with two epic rappels, or hike out to the south. We highly recommend the last two rappels!
BLARNEY
3A II
CHECK IT OUT ON ROADTRIP RYAN HERE.
Once you get your bearings and feel comfortable with the technical moves required for down climbing, this canyon is an absolute must!
We recommend the left fork. A moderate approach and EPIC canyon have made this one of our all time favorites. Make sure you feel confident in your ability to navigate through small spaces and safely lower yourself 10-15 ft before you go.
Head over to our instagram and check out our highlights on these three canyons.


2 comments
Thanks for mentioning that you really like the dual connect adjust for canyoneering. My husband and I are taking our anniversary trip to Saint George in October, and we’d love to go canyoneering. It would be really lovely to take a tour through a professional company, just so we know it’s safe. https://rockodysseys.rocks/canyoneering/
Thanks for mentionig that you really like the dual connect adjust for canyoneering. My husband and I are taking our anniversary trip to Saint George in October, and we’d love to go canyoneering. It would be really lovely to take a tour through a professional company, just so we know it’s safe. https://rockodysseys.rocks/canyoneering/